Communication chain on USRPs using QPSK » History » Version 19
« Previous -
Version 19/39
(diff) -
Next » -
Current version
PASCHOS, Alexandros, 12/15/2015 01:06 AM
Communication chain on USRPs using QPSK
Setup
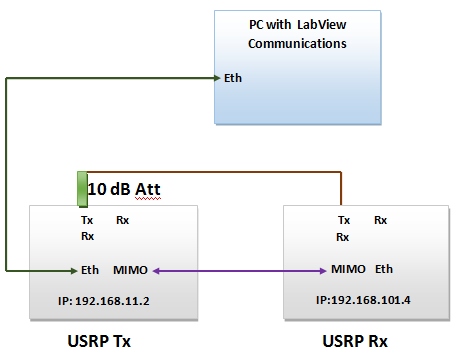
To successfully connect two USRPs using the inventory mentioned earlier, it is required to have an Ethernet cable connected from the PC to one of the USRPs (in this case the Tx USRP) and then a MIMO cable that connect the Tx USRP to the Rx USRP. This way, the Rx USRP is also connected to the PC. The RF cable is connected from the USRP, using a 30dB attenuator to the Rx USRP. Below is a diagram of the setup. An update to the version of the FPGA image file might needed for LabVIEW Communications. In the NI USRP Utility an update to the images is done as demanded by the software.

Figure 2.1 Set-up diagram of the USRPs
Transmission with QPSK
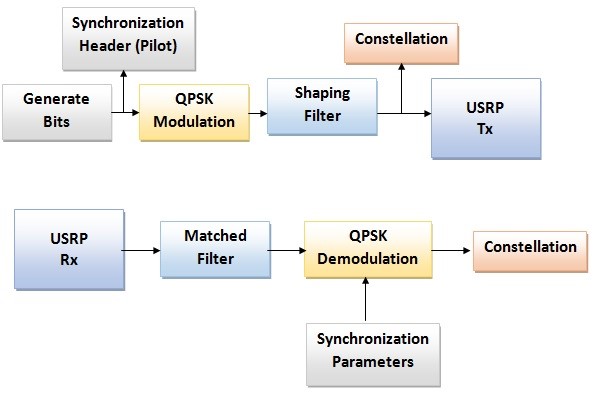
The block diagram of the communication chain is shown below in figure 4. An existing example of USRP communication with PSK was used for guidance.

Figure 2.2 Set-up Communication Chain between USRPs
Bits are generated (Galois) using a PN (pseudo noise) sequence. The signal is then modulated, filtered and sent to the transmitting USRPS, which is continuously transmitting. The receiving USRP will obtain the data from the transmitting USRP, and the signal is filtered with a matched filter, demodulated, and the constellation is plotted.
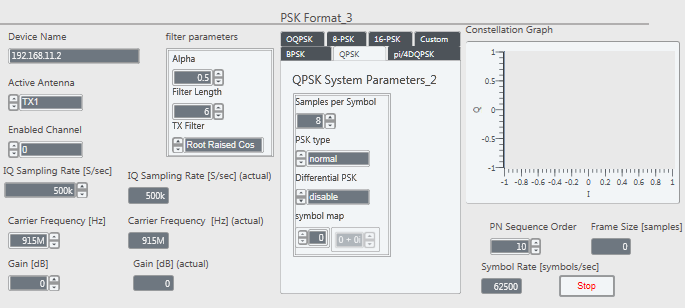
On the front panel of the transmission there are several inputs and outputs:
| Inputs/Controls | Outputs/Indicators | Figure 2.3 Set-up Front Panel Tx |
| - The IP address of the Tx USRP - The transmission antenna of the USRP - Selection of a specific USRP channel - IQ sampling rate [Samples/sec] - Carrier Frequency [Hz] - Gain [dB] - PN order sequence Filter Parameters - Roll-off - Filter length - Filter Type {None, Raised Cosine, Root Raised Cosine, Gaussian} Modulation Parameters - Samples per Symbol - PSK type {normal, differential} - Symbol Map |
- IQ Sampling Rate [Samples/sec] - Carrier Frequency [Hz] - Gain [dB] - Symbol Rate [symbols/sec] - Frame Size [samples] - Constellation graph [IQ] |
 |
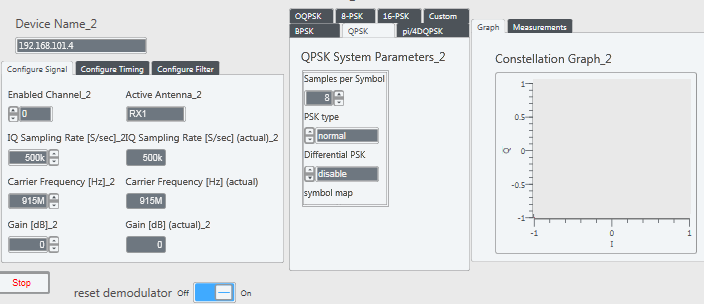
For the Receiving part of the VI, the front panel is depicted below:
| Inputs/Controls | Outputs/Indicators | Figure 2.3 Set-up Front Panel Rx |
| - The IP address of the Rx USRP Configure Signal Tab - The enabled USRP channel - The reception antenna of the USRP {RX1, RX2} - IQ sampling rate [Samples/sec] - Carrier Frequency [Hz] - Gain [dB] Configure Timing Tab - Acquisition Time - Symbol Rate [Hz] Configure Filter Tab - Roll-off - Filter length - Filter Type {None, Raised Cosine, Root Raised Cosine, Gaussian} Modulation Parameters - Samples per Symbol - PSK type {normal, differential} - Symbol Map |
Configure Signal Tab - IQ Sampling Rate [Samples/sec] - Carrier Frequency [Hz] - Gain [dB] - Symbol Rate [symbols/sec] Configure Timing - Frame Size [samples] - Constellation graph [IQ] Measurements - Frequency offset [Hz] - Frequency Drift [Hz] |
 |
Pilot Header for Synchronization
Note that in the diagram, there are synchronization parameters. This is done because of the type of filtering (matched filtering) that is applied to the signal. Matched filtering is used in order to maximize the SNR, thus minimizing the BER. However, as it is well known, the output signal is delayed because of the transient response, known as filter delay. Therefore a pilot header for synchronization purposes is introduced into the bit stream previously created. This header, along with the expected location in the bit stream (bit 0) are the synchronization parameters which are to the demodulation function in order to properly decode the bits received.
